Hi, how are you all ? I am sorry I have not been around much but I am here now to show you my tutorial using alcohol & blend pens, together with brand new gorgeous HoneyBee Home and Blessings of Home stamp sets.
I hope you will enjoy crafting along and creating your own beautiful card.
Products Used – (links to the products are at bottom of post)
- Honeybee Home stamp set
- Blessings of Home stamp set
- Honeybee Blooms die set
- Hive Embossing Folder
- Stitched So Sweetly dies
- Stitched Shapes dies
- Card stock in Basic White thick, basic white, Daffodil Delight, Soft Succulent, Basic Black & Vellum
- Blend Pens – Daffodil Delight & Soft Succulent
- Wink of Stella
Card
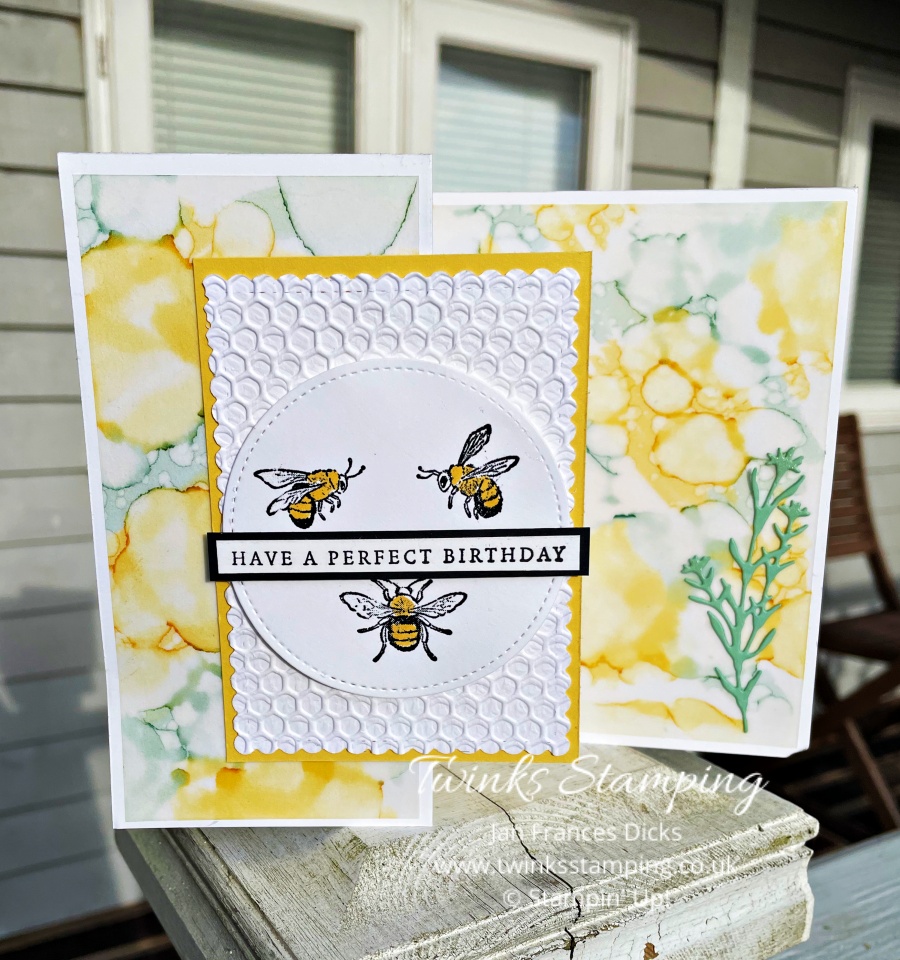
Cut your base card from basic white thick card stock, to measure 29.2cm x 29.2cm (5 3/4″ x 5 3/4″ ) score on long side at 29.2cm (5 3/4″) Fold and burnish.
Open your card out and place back in your trimmer and score the left hand side at 7.3 cm (2 7/8″). Fold and burnish this back on your card to create a flap.
Vellum
From a piece of vellum, cut a piece to measure 14.8cm x 10.5cm. ( 5 13/16″).
Using your blend pens, scribble over the vellum creating a pattern of your choice . Put a little Isopropanol in a small pot and using a little paint brush, flick the Isopropanol onto the vellum, putting on as little or as much as you like. Let this dry completely before cutting.
Once dry, place long side at top of your cutter and cut at 14cm x 14cm (5 1/2″ x 5 1/2″). Adhere flat to the right hand side of your card. Careful not to put too much glue on this.
Take the piece left over from this and trim to measure 14cm x 6.8cm ( 5 1/2″ x 2 11/16`’). Adhere to the front flap of your card.
Decoration
The daffodil delight card stock should be cut to measure 11cm x 8cm (4 5/16″ x 3 1/8″)
Die cut a piece of basic white cardstock using the largest of the Stitched So Sweetly rectangle dies. Then place this in the Hive 3D embossing folder and emboss. This can now be adhered to the daffodil delight mat and then both adhered to the left hand flap so that it sits half on and half off.
From basic white card stock, cut the largest stitched circle from the Stitched Shaped dies. Stamp your bee images onto your stitched circle. The images can now be coloured and Wink of Stella’d! Place dimensionals (foam pads) on the back of the circle and adhere to the mat.
Stamp your sentiment from the Blessings of Home stamp set onto white card stock and then layer onto basic black card stock. This can now be adhered across the front of the stitched circle using dimensionals (foam pads).
Lastly, die cut a flower from the Honeybee Blooms dies and adhere flat to the right hand side of your card.
Classes at Home or in person
KITS
Many of us are at home and wondering how to fill our time. Well, I can offer monthly card kits to keep you busy. Please click here for more details.
CLASSES
I run a class in a lovely hall in Hailsham – Click here for more details.
Classes are now being held in my lovely Studio on a regular basis. If you would like details, just click on the picture below.
Thinking of joining Stampin’ Up! ?
So, do you know what you will receive by signing up? There are certainly many rewards and benefits that are on offer!
One of the first benefits you will receive will be your bespoke “Starter Kit” which will be £130.00 worth of your chosen product for just £99.00 and it will be sent to your home absolutely free of charge! You will also receive business products too to help you start your very own business (if that is what you wish to do).
That is not all, you will also receive a 20 / 25% discount on all of your future products . You will be one of the first to know about new products and offers, you can have your own dedicated website/shop and you can join exclusive Facebook groups for inspiration and assistance, should you need it. So whether you are someone who just wants to buy the lovely products for yourself and your family & friends or whether you want to start your own little crafty business, I am here to help you.
If you think that this will be of interest to you, just click on the link Join my team page for more details, where you will find more information.
Thank you for stopping by today.
Take care
Jan x
LINK FOR STAMPING BUDDY: https://twinksstamping.co.uk/?post_type=product&p=12694&preview=true
Products Used
Product List")
")

")